Building a Progressive Web application(PWA) with Laravel

👋 As a seasoned developer, I specialize in crafting robust web applications using an array of cutting-edge technologies. 💻 With expertise in Laravel for full-stack development and MySQL for database management, I ensure seamless data handling and server-side logic. 🚀 On the front-end, I harness the power of Vue.js for dynamic and responsive user interfaces, coupled with the elegance of Tailwind CSS for sleek and efficient designs. 🎨 Additionally, I utilize Laravel Livewire to bring real-time interactivity to web applications, creating a seamless and engaging user experience. 🌟 My holistic skill set encompasses the entire web development stack, allowing me to bring web projects to life with precision and innovation. 🌐 Let's embark on a web development journey together! 🔥💼
What is a Progressive Web Application(PWA)?
Progressive Web Application (PWA) is a type of web application that takes advantage of modern web technologies to provide a more app-like experience to users. PWAs aim to combine the best of both web and mobile app experiences.
It is designed to work for all users, regardless of their browser or device. They use progressive enhancement to ensure basic functionality for all while providing more advanced features for users with modern browsers.
Why PWA instead of a traditional web application?
Offline Functionality: PWAs can work offline or in low-network conditions. This means users can still access and interact with the app even when they're not connected to the internet to some extent.
Responsive Design: PWAs are built with responsive design principles, ensuring that they look and work well on a variety of devices, including desktop computers, smartphones, and tablets.
App-Like Experience: PWAs are designed to mimic the look and feel of native mobile apps. They can be added to the home screen of a user's device and launched from there. They typically have an app-like icon, name, loading screen, and a shell or frame that looks similar to a native app.
Fast Loading: PWAs are optimized for fast loading and smooth performance, which is crucial for providing a good user experience.
Secure: PWAs are served over HTTPS to ensure data security and integrity.
Push Notifications: PWAs can send push notifications to users, similar to what native mobile apps can do. This enables real-time updates and engagement.
No App Store Installation: Unlike native apps, PWAs don't need to be installed from an app store. Users can discover and access them directly through a web browser, reducing friction in the onboarding process.
Cross-Platform: PWAs are platform-agnostic and can work on different operating systems, such as iOS, Android, and Windows.
Linkable: Each page or piece of content in a PWA has a unique URL, making it easy to share and link to specific sections of the app.
Service Workers: PWAs use service workers, a type of script that runs in the background and handles tasks like caching, push notifications, and offline access.
Here is the step-by-step guide to making a progressive web application using Laravel:
Step 1: Set Up a New Laravel Project
To get started, open your command-line interface and navigate to the directory where you want to create your Laravel project. Run the following command to create a new Laravel project:
composer create-project --prefer-dist laravel/laravel laravel-pwa-app
or you can use the Laravel installer to create a new Laravel application.
Step 2: Install Laravel PWA Package
Next, install the Laravel PWA package, which provides the necessary tools and configurations for building a PWA in Laravel. There is a bunch of laravel-pwa pwa package that can do the heavy lifting for us like silviolleite/laravel-pwa and ladumor/laravel-pwa. For this demo, I will use ladumor/laravel-pwa.
Use the following command to install the package:
composer require --dev ladumor/laravel-pwa
if your Laravel version is less than 6.0, then you need to add the provider to your config/app.php into provider section
Ladumor\LaravelPwa\PWAServiceProvider::class,
and add the Facade to your config/app.php into aliases section,
'LaravelPwa' => \Ladumor\LaravelPwa\LaravelPwa::class,
else you are using greater than 6.0 then it will get added automatically.
Step 3: Generate the Service Worker
The Service Worker is a crucial component of a PWA that makes it possible to properly cache the assets of a website and make them available when the user's device is offline.
Let's publish the service worker and other config files using the following command:
php artisan laravel-pwa:publish
This command will publish 3 files sw.js, manifest.json, offline.html and a logo logo.png inside the public directory.
Step 4: Configure PWA Manifest file
The PWA Manifest file contains metadata about your application, such as its name, icons, and theme color. Open the config/pwa.php file and customize the default settings according to your application's requirements.
open manifest.json file and make necessary changes like name description and logo.
{
    "name": "Laravel-PWA-App",
    "short_name": "LPA",
    "start_url": "/index.php",
    "background_color": "#6777ef",
    "description": "Demo laravel progresive Web Application",
    "display": "fullscreen",
    "theme_color": "#6777ef",
    "icons": [
        {
            "src": "logo.PNG",
            "sizes": "512x512",
            "type": "image/png",
            "purpose": "any maskable"
        }
    ]
}
you can specify multiple icons of different sizes.
Step 5: Configure PWA Views
For this open your root blade file. In my case, it's the welcome.blade.php .
Inside the head tag add the following code:
<!-- PWA  -->
<meta name="theme-color" content="#6777ef"/>
<link rel="apple-touch-icon" href="{{ asset('logo.PNG') }}">
<link rel="manifest" href="{{ asset('/manifest.json') }}">
Next, add the below script before the body tag closes in the same root blade file.
<script src="{{ asset('/sw.js') }}"></script>
<script>
   if ("serviceWorker" in navigator) {
      // Register a service worker hosted at the root of the
      // site using the default scope.
      navigator.serviceWorker.register("/sw.js").then(
      (registration) => {
         console.log("Service worker registration succeeded:", registration);
      },
      (error) => {
         console.error(`Service worker registration failed: ${error}`);
      },
    );
  } else {
     console.error("Service workers are not supported.");
  }
</script>
now your PWA is ready to rock. It's time to serve your project.
run php artisan serve and visit your local URL. You will see an install icon on left side of your browser URL input field as shown below image:

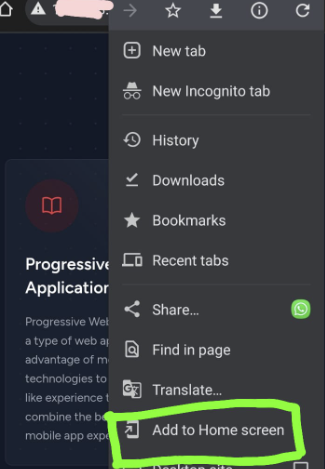
Click the install button if you are on a desktop and it will be installed and will open like a desktop application, in the mobile browser click on the 3 dots and choose Add To Home Screen.
Now it will open as a native mobile application with full screen.
And That is all, you have successfully made a full-functioning PWA using Laravel.
Click here for the final source code.
Conclusion
Progressive Web Applications are undoubtedly changing the way we approach web development. With their enhanced user experience, offline capabilities, and cross-platform accessibility, PWAs have a bright future in the world of web applications. While they may have some limitations, their numerous advantages make them an excellent choice for various types of applications. As web technologies continue to evolve, PWAs will likely play an increasingly important role in the digital landscape. Keep Progressing like the P on PWA.