Create Vue plugin in with real world example.

👋 As a seasoned developer, I specialize in crafting robust web applications using an array of cutting-edge technologies. 💻 With expertise in Laravel for full-stack development and MySQL for database management, I ensure seamless data handling and server-side logic. 🚀 On the front-end, I harness the power of Vue.js for dynamic and responsive user interfaces, coupled with the elegance of Tailwind CSS for sleek and efficient designs. 🎨 Additionally, I utilize Laravel Livewire to bring real-time interactivity to web applications, creating a seamless and engaging user experience. 🌟 My holistic skill set encompasses the entire web development stack, allowing me to bring web projects to life with precision and innovation. 🌐 Let's embark on a web development journey together! 🔥💼
Vue.js is a popular JavaScript framework for building user interfaces. One of the powerful features of Vue.js is its extensibility through plugins. Vue.js plugins allow you to encapsulate and reuse functionality across different Vue.js applications. In this article, we will walk through the process of creating a Vue.js plugin with a real-world example.
Plugins are self-contained code that usually add app-level functionality to Vue.
Before we dive into creating a Vue.js plugin, make sure you have:
Node.js and npm installed
Vue CLI or Vite
Basic Vue.js knowledge
Creating a Vue.js Plugin
Here, we'll create two simple Vue.js plugins
Reverse String: will provide a global method to reverse the given string.
Report Us: will open a popup model with a form to report page issues.
Example: 1. Reverse String
Set Up a New Vue Project:
To get started, let's create a new Vue.js project using the Vue CLI. Open your terminal and run the following commands:
vue create vue-simple-plugin
cd vue-simple-plugin
npm install
Follow the prompts to configure your project. Once your project is set up, navigate to its root folder.
Create a Plugin File:
It is always recommended to create plugins into separate folders so let's create a plugins directory inside /src directory. Inside plugins create another directory with the name of the plugin Reverse inside this we'll create a file called reverse.js. This is the entry point of our plugin.
//plugins/Reverse/reverse.js
export default {

  install(app, options) {
    app.config.globalProperties.$reverse = (str) => {
        // logic to reverse string
        return str.split('').reverse().join('')
      }
  }
};
In this code, we define a Vue.js plugin that adds a $reverse method to the Vue prototype. This method takes a string as input and then reverses the string using the split, reverse, and join array methods.
Step 2: Use the Plugin
we have completed writing our plugin. Now it is time to use the plugin. For this we will import the plugin in our main.js file and then the $reverse method will be available globally in our components.
//main.js
import { createApp } from 'vue'
import App from './App.vue'
import reverse from './plugins/Reverse/reverse'


const app = createApp(App);
app.use(reverse);
app.mount('#app');
now we can use it in any component as follows:
//SampleComponent.vue
<script setup>
</script>
<template>
  <div>
    <h1>Below text will be reversed</h1>
  </div>
       <h1> {{ $reverse("Was it a car or a cat I saw") }}</h1>
       <h1>{{ $reverse("Mr. Owl ate my metal worm") }}</h1>
</template>
Output:

Example: 2. Report Us
Step 1 is the same as above, so for step 2 we will create another directory inside plugins called ReportUs inside this let's create a component called ReportUsModal.vue
//plugins/ReportUs/ReportUsModal.vue
<template>
    <div>
        <!-- Report Us Button -->
        <button @click="openModal" class="ru-report-button">Report Us</button>

        <!-- Modal -->
        <div v-if="isModalVisible" class="ru-modal">
            <div class="ru-modal-content">
                <h2 class="ru-modal-title">Report Issue</h2>
                <form @submit.prevent="submitReport">
                    <div class="ru-form-group">
                        <label for="title" class="ru-label">Title:</label>
                        <input type="text" id="title" v-model="report.title" required class="ru-title-input" />
                    </div>
                    <div class="ru-form-group">
                        <label for="description" class="ru-label">Description:</label>
                        <textarea id="description" v-model="report.description" required class="ru-description-input"></textarea>
                    </div>
                    <div class="ru-button-group">
                        <button type="button" @click="closeModal" class="ru-cancel-button">Cancel</button>
                        <button type="submit" class="ru-submit-button">Submit</button>
                    </div>
                </form>
            </div>
        </div>
    </div>
</template>

<script>
import axios from 'axios';
export default {
    data() {
        return {
            isModalVisible: false,
            report: {
                title: "",
                description: "",
            },
        };
    },
    methods: {
        openModal() {
            this.isModalVisible = true;
        },
        closeModal() {
            this.isModalVisible = false;
        },
        submitReport() {
            // You can replace 'your-api-endpoint' with the actual URL where you want to submit the report.
            const apiUrl = '/report-us';

            // Use Axios to send the report data to the server.
            axios
                .post(apiUrl, this.report)
                .then(() => {
                    alert('Report submitted successfully');
                    this.closeModal();
                })
                .catch((error) => {
                    alert('Error submitting report: ' + error);
                     this.closeModal();
                });
        },
    },
};
</script>

<style scoped>
/* Add your CSS styles for the modal here */

.ru-title-input {
    background: rgb(217, 213, 213);
}
.ru-description-input {
    background: rgb(217, 213, 213);
}
.ru-modal {
    position: fixed;
    top: 0;
    right: 40%;
    width: 100%;
    height: 100%;
    background-color: rgba(0, 0, 0, 0.5);
    display: flex;
    justify-content: center;
    align-items: center;
    z-index: 999;
}

.ru-modal-content {
    background-color: white;
    padding: 20px;
    border-radius: 5px;
    box-shadow: 0px 0px 10px rgba(0, 0, 0, 0.5);
}

.ru-form-group {
    margin-bottom: 10px;
}

.ru-label {
    color: gray;
    /* Text color for labels */
    display: block;
    /* Ensure labels are on top of inputs */
    margin-bottom: 5px;
    /* Add some spacing between label and input */
}

.ru-input {
    width: 100%;
    padding: 5px;
    border: 1px solid #ccc;
    border-radius: 3px;
    font-size: 16px;
}

.ru-input-textarea {
    height: 100px;
}

.ru-button-group {
    margin-top: 10px;
    text-align: right;
    /* Align buttons to the right */
}

.ru-button {
    padding: 5px 10px;
    margin-left: 5px;
    cursor: pointer;
    border: none;
    border-radius: 3px;
    font-size: 16px;
}

.ru-report-button {
    position: fixed;
    bottom: 20px;
    /* Adjust the distance from the bottom as needed */
    left: 20px;
    /* Adjust the distance from the left as needed */
    background-color: #007BFF;
    color: white;
}

.ru-cancel-button {
    background-color: #007BFF;
    color: white;
    margin-right: 2px;
}

.ru-submit-button {
    background-color: #28A745;
    /* Change submit button color */
}
.ru-modal-title {
    color: gray; /* Gray text color for the modal title */
}
</style>
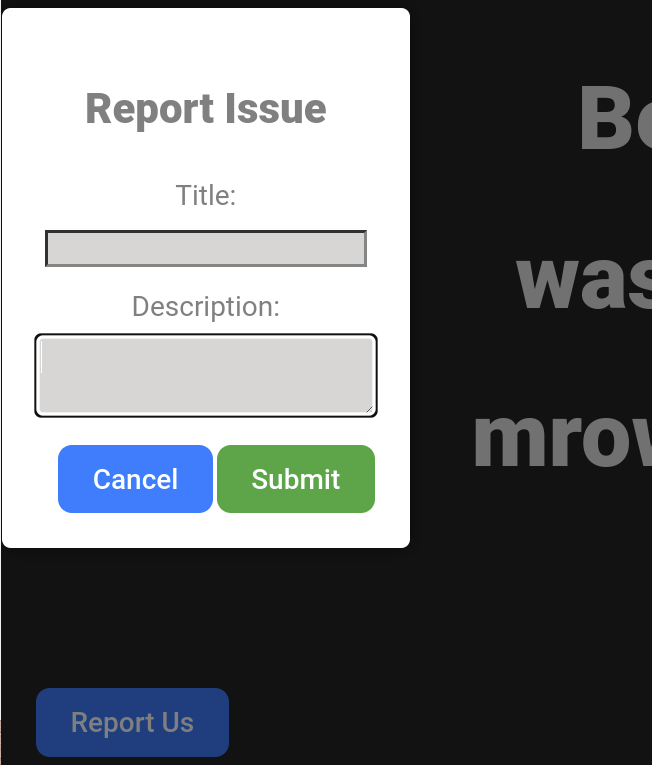
in the above code, I have created a Vue component with a modal popup with input fields title and text area description along with cancel and submit buttons. The modal will open on click of the Report us button. once we use the component the Report us button will appear in the bottom left corner of the screen. on click of the submit button, it will send an Axios request to a specified Url.
now let's create a report-us.js file for the entry point of the plugin and register our component there.
//plugins/ReportUs/report-us.js
import ReportUsModal from './ReportUsModal.vue';

export default {
  install(Vue) {
    // Register the ReportUsModal component globally
    Vue.component('ReportUsModal', ReportUsModal);
  },
};
Now it's time to use the plugin. open the main.js file and use the plugin as follows:
import { createApp } from 'vue'
import App from './App.vue'
import ReportUsModal from './plugins/ReportUs/report-us.js'
import reverse from './plugins/Reverse/reverse'


const app = createApp(App);
app.use(ReportUsModal);
app.use(reverse);
app.mount('#app');
and add the component inside your App.vue component as follows:
//App.vue
<script setup>
</script>
<template>
  <div>
    <h1>This is App.vue component</h1>
  </div>
    // used the coponent without import
  <ReportUsModal/>
</template>
Output:
Github Repo: https://github.com/MrBhola/vuejs-plugin
Conclusion
here I have demonstrated two basic examples, there is a lot more to explore. It is either an object that exposes an install() method, or simply a function that acts as the install function itself. It may Register one or more global components by app.component() or custom directives by app.directive(), make a resource injectable throughout the app by app.provide() or add some global instance properties or methods by app.config.globalProperties. . A library will perform some combination of these actions. example vue-router
Hence, This demonstrates the power of Vue.js plugins in extending Vue's functionality and encapsulating reusable code. You can expand on this example by creating more complex plugins to enhance your Vue.js applications with custom functionality.
So keep Exploring and plugging in!