Automated testing has become very essential in modern application development as it ensures a higher level of quality. At the base level of software testing pyramid we have many tools for writing unit tests. Then in the middle we have integration tests. End-to-end tests is at the very top, which covers the most critical use cases. We explain more about Cypress and how it is a popular E2E testing tool out there.
What Are End-To-End Tests?
End-to-end (or E2E) testing is similar to “workflow-based” testing. In this testing we simulates actual user workflows and should include as many functional areas and parts of the technology stack used in the application as possible. Let’s imagine visiting a website, navigating to the user registration page and filling up a long registration form. This workflow could be tested automatically and multiple times during the course of software development to ensure quality experience for the end user. In the end, it is just a computer pretending to be a customer and tries to behave like a real user would.
What is Cypress?
Cypress is an open source application testing tool, locally installed Test Runner and Dashboard Service for recording our tests. It is a frontend and backend test automation tool built for the next generation of modern web applications.
Cypress is an all-in-one testing framework which uses Node.js to start a browser under special control, unlike most E2E testing tools which uses Selenium and WebDriver. The tests in this framework are run at the browser level, not just remote-controlling. This offers several advantages.
Cypress is not only for QA engineers but also useful for developers as well. We can test applications developed in React.js, Angular.js, Node.js, Vue.js, and other front-end technologies.
Key Features of Cypress:
- Mocking - By mocking the server response, it has the ability to test edge cases.
- Test Runner - Cypress ships with very intuitive and powerful test runner application to view the test in real time and inspect the UI elements.
- Time Travel - It takes snapshots as your tests run, allowing users to go back and forth in time during test scenarios.
- Flake Resistant – It automatically waits for commands and assertions before moving on.
- Spies, Stubs, and Clocks - It can verify and control the behavior of functions, server responses, or timers.
- Real Time Reloads - It automatically reloads whenever you make changes to your tests.
- Consistent Results - It gives consistent and reliable tests that aren’t flaky.
- Network Traffic Control - Easily control, stub, and test edge cases without involving your server.
- Automatic Waiting - It automatically waits for commands and assertions without ever adding waits or sleeps to your tests. No more async hell.
- Screenshots and Videos - View screenshots taken automatically on failure, or videos of your entire test suite when it has run smoothly.
- Debuggability - Readable error messages help you to debug quickly.
Exited? Let’s get started then.
Installation
Node.js
Cypress requires Node.js to be installed on your system. Download and install the version supported by your operating system. At the time of writing this blog I have used Node.js version 16.14.2 LTS.
For Linux users, there are some additional dependencies to be installed. Read more here.
Installing via Node Package managers
NPM
cd /your/project/path
npm install cypress --save-dev
Yarn
cd /your/project/path
yarn add cypress --dev
Since we adding Cypress to an existing project, we had it as a dev dependency so that it won’t be installed on production environment. At the time of writing this blog we are using Cypress version 9.5.2. There are also other options to install Cypress, read more here.
Running Cypress
After installing from package manager like NPM or Yarn, Cypress will be installed in ./node_modules folder, with its binary executable accessible from ./node_modules/.bin.
Now you can open Cypress from your project root one of the following ways:
Using npm
./node_modules/.bin/cypress open
Or by using npx
note: npx is included with npm > v5.2 or can be installed separately.
npx cypress open
Or by using yarn
yarn run cypress open
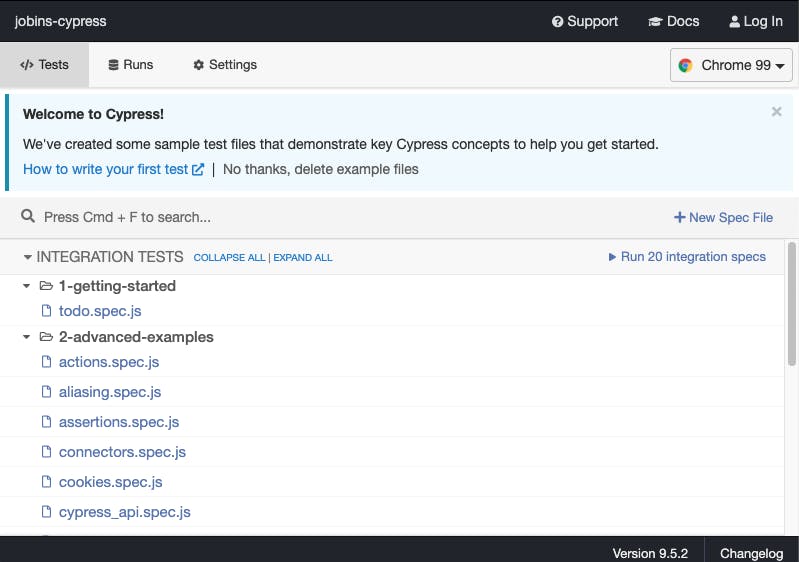
This will launch Cypress Test Runner and you will see this interface:

Folder Structure
Let’s open our project folder in any integrated development environment (IDE) of choice, you will see the following test structure:
jobins-cypress
  └── cypress
      └── fixtures
      └── integration
      └── plugins
      └── support
  └── cypress.json
Let’s go over what these folders are for:
- fixtures - Here is where you’ll find fixed test data, which have no relation to the other entities.
- integration - You will find the actual tests here.
- plugins - Here, you can extend Cypress, whether with existing Cypress plugins or your own.
- support - Here, you can extend Cypress itself. Your own commands and helpers are located here.
- cypress.json - Modify configurations here, including for the environment.
Note: After the initial installation of Cypress you will find some example test files within the integration folder to help you get started.
Writing our first test
In the integration folder, we’ll create a new file. Let’s name it find-author.spec.js. The suffix .spec stands for “specification” which refers to the technical details of a given feature that our application will perform.
We start by giving a structure to this file. We’ll use the method called describe() to contain and serves as a frame to organize our tests. Our test file will look like this:
// find-author.spec.js
describe('Find author on Hashnode', () => {
  //...
});
The next step is to create the actual test. We’ll use the method it. it() is used to represent the actual test. As you can see, we can capture multiple tests in one file, which allows for some excellent structuring options.
// find-author.spec.js
describe('Find author on Hashnode', () => {
  it('Find the author JoBins', () => {
    cy.log('This is a test');
  });
});
Note: Cypress is built on top of Mocha, so it would be helpful to learn some basics of Mocha test framework.
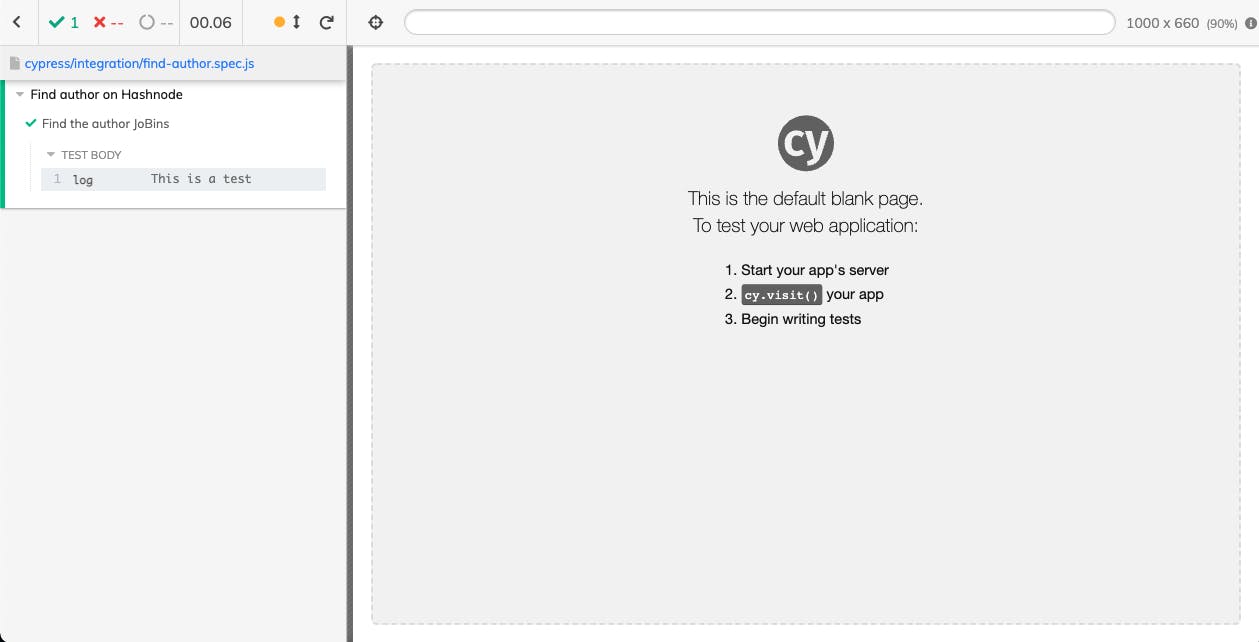
Now if we run our test in Cypress test runner, we’ll see that Cypress will open a browser to run the test. This browser is seen in the screenshot below:

We have just written a simple test case to show to structure of our test suite. Now let’s add some actual tests.
Commands
When we want to search something on a website we start by opening the website, navigate to a page or simply type our search query on the search bar. The website will then provide us results if it finds our item. This is a simple workflow which we write in terms of command chain in our test file.
Our simple test suite to perform the above simple task will look like this:
it('Find the author JoBins', () => {
  // Open the website
  cy.visit('https://hashnode.com/search');

  // Enter author’s name in search field
    cy.get("input[type='text']").first().type("JoBins", { force: true });

  // Navigate to author’s article
  cy.get('h3 > a').first().click();

  // Open the author’s page
  cy.get('.author-title').click();
});
In the example above we have used methods like visit and get . The visit() method navigate to a URL which we provide as our starting point. The get() command takes a “selector” as parameter to fetch UI element in the browser. We can then perform certain actions like typing, click, etc. with selected elements.
Assertions
With assertions we test or check if our commands has lead to certain expected output. Assertions in Cypress are based on Chai and Sinon-Chai assertions.
In our find-author.spec.js test we add assertions to check whether we’re on the author’s profile page. For this, we check to see if the redirected page contains the word “JoBins” and is visible.
// Check if we’re on the author’s profile page
cy.contains('.author__title', 'JoBins').should('be.visible');
We can add more assertions to make precise checks if the result are as expected or not.
Our test file with assertion will look like this:
it('Find the author JoBins', () => {
  // Open the website
  cy.visit('https://hashnode.com/search');

  // Enter author’s name in search field
    cy.get("input[type='text']").first().type("JoBins", { force: true });

  // Navigate to author’s article
  cy.get('h3 > a').first().click();

  // Open the author’s page
  cy.get('.author-post__author-title').click();

    // Check if we’re on the author’s site
    cy.contains('.author__title', 'JoBins').should('be.visible');
});
Conclusion
End-to-end tests are an essential component of Continuous Integration (CI), assuring a higher quality applications and at the same time relieving the work of QA and developers. Cypress is recommended tool for debugging end-to-end tests quickly, and efficiently.
With some basics of Javascript, Mocha and Chai, it is easy start writing test with Cypress.
Resources
- Cypress documentation
- “Recipes”, Cypress - A selection of examples, recipes, and courses.
- “Learn to Code With JavaScript: Cypress” (lesson), CodeLikeThis

